What Is Footography? Defining the Art Form
Footography is the specialized practice of foot photography that combines technical photography expertise with aesthetic sensibility specific to capturing feet. It's not just taking random pictures of feet—it's an intentional craft that involves composition, lighting, styling, and post-processing to create visually compelling images.
The term "footography" merges "foot" with "photography," and while it might sound playful, it represents a legitimate niche within both fine art photography and commercial content creation. Think of it as similar to how food photography isn't just pictures of meals—it's a specialized skill requiring specific techniques to make the subject matter look its best.
🎨 Footography vs. Casual Feet Pics
Casual Feet Pics:
- • Spontaneous phone camera snapshots
- • Minimal consideration for lighting or composition
- • Often taken for personal sharing or quick sales
- • Basic or no post-processing
- • Price point: $5-20 per image
Professional Footography:
- • Intentional artistic or commercial planning
- • Controlled lighting setups and backdrops
- • Careful composition following photography principles
- • Professional editing and color grading
- • Price point: $50-500+ per image or set
The Evolution of Footography: From Niche to Mainstream
Foot photography has existed as long as cameras have, but footography as a recognized specialty emerged in the 2010s with the rise of social media and niche content platforms. What started as underground fetish content gradually evolved into a legitimate creative and commercial practice.
Several factors contributed to footography's professionalization:
Social Media Normalization
Instagram, TikTok, and OnlyFans normalized niche content creation, making footography more socially acceptable and accessible to mainstream audiences.
Economic Opportunity
The gig economy and creator economy made footography a viable income stream. Successful creators now earn substantial incomes, legitimizing it as a profession.
Artistic Recognition
Fine art photographers began exploring feet as artistic subjects, elevating footography beyond purely commercial purposes and into galleries and exhibitions.
Technology Advancement
Better cameras, affordable lighting equipment, and advanced editing software made professional-quality footography accessible to more creators.

Artistic Footography vs. Commercial Footography
Footography splits into two primary categories, each with distinct goals, techniques, and audiences:
| Aspect | Artistic Footography | Commercial Footography |
|---|---|---|
| Primary Goal | Self-expression, emotional impact, aesthetic exploration | Meeting buyer preferences, maximizing sales |
| Audience | Art collectors, galleries, personal portfolio | Content buyers, subscribers, clients |
| Creative Freedom | Complete artistic control | Balanced with market demands and buyer requests |
| Style | Experimental, conceptual, fine art techniques | Polished, appealing, trend-aware |
| Monetization | Print sales, exhibitions, limited editions | Platform sales, subscriptions, custom requests |
| Production Volume | Lower volume, each piece significant | Higher volume, consistent output |
| Editing Style | Dramatic, moody, abstract, experimental | Clean, natural-to-enhanced, buyer-friendly |
Many successful footography creators blend both approaches—maintaining an artistic vision while producing commercially viable content. The key is understanding which audience you're serving with each piece and adjusting your approach accordingly.
Essential Equipment for Professional Footography
You don't need $10,000 in gear to start, but having the right tools dramatically improves your results. Here's a breakdown by budget level:
💚 Beginner Setup ($200-500)
- •Camera: Modern smartphone (iPhone 13+, Samsung S21+, Google Pixel 6+) with good low-light performance
- •Lighting: Ring light (10-14 inch, $30-60) or softbox light kit ($80-150)
- •Backdrop: Solid color fabric, bed sheets, or foam boards ($15-40)
- •Tripod: Basic smartphone tripod ($15-30)
- •Editing: Free apps (Snapseed, VSCO, Lightroom Mobile)
This setup is perfect for testing the market and learning basics before investing more.
💙 Intermediate Setup ($800-2,000)
- •Camera: Mirrorless camera (Sony A6400, Canon M50, Fuji X-T30) or entry DSLR (Canon Rebel T7i, Nikon D5600)
- •Lens: 50mm f/1.8 prime lens for beautiful bokeh and detail ($150-250)
- •Lighting: Three-point lighting kit with softboxes and stands ($200-400)
- •Backdrop: Collapsible backdrop system with multiple colors ($100-200)
- •Tripod: Quality aluminum tripod with ball head ($80-150)
- •Editing: Adobe Lightroom subscription ($10/month) or Capture One
This setup enables consistent professional-quality results and sets you apart from casual creators.
💜 Professional Setup ($3,000-8,000+)
- •Camera: Full-frame mirrorless (Sony A7 IV, Canon R6, Nikon Z6 II) with high megapixel count
- •Lenses: Multiple prime lenses (35mm f/1.4, 50mm f/1.2, 85mm f/1.4) and macro lens (90-105mm f/2.8)
- •Lighting: Professional strobe lighting system with modifiers (Godox, Profoto, Elinchrom)
- •Studio: Dedicated shooting space with permanent backdrop system, props library
- •Accessories: Reflectors, diffusers, color gels, remote triggers, multiple memory cards
- •Post-production: Adobe Creative Cloud suite, Capture One Pro, specialized plugins
Professional setup for creators earning $2,000+ monthly who need maximum quality and efficiency.
Mastering Footography Lighting: The Make-or-Break Factor
Lighting is the single most important technical aspect of footography. Poor lighting makes even perfect feet look unappealing, while great lighting can elevate average shots into professional-looking content.
🌅 Natural Light Footography
Natural window light creates soft, flattering results perfect for artistic and lifestyle footography.
Best conditions: Shoot 2-3 hours after sunrise or 2-3 hours before sunset when light is softest
Window technique: Position subject 3-6 feet from a large window with sheer curtains for diffusion
Fill light: Use a white foam board or reflector opposite the window to fill shadows
Avoid: Harsh midday sun, direct sunbeams, mixed color temperatures
💡 Artificial Light Setups
Artificial lighting gives you complete control and consistency, essential for commercial footography.
One-Light Setup (Beginner)
- • Single softbox or ring light at 45-degree angle to subject
- • Position 3-4 feet away from feet
- • Use reflector on opposite side to reduce harsh shadows
- • Best for: Close-ups, simple compositions
Two-Light Setup (Intermediate)
- • Key light (main): Larger softbox at 45 degrees, slightly higher than subject
- • Fill light: Smaller light or reflector opposite key light at lower intensity
- • Creates dimension while maintaining detail
- • Best for: Full foot shots, lifestyle scenes
Three-Light Setup (Advanced)
- • Key light: Main light source as described above
- • Fill light: Reduces shadows created by key light
- • Back/rim light: Positioned behind subject to create separation from background
- • Creates professional three-dimensional look with depth
- • Best for: Premium content, artistic shots
⚠️ Common Lighting Mistakes to Avoid
- ✗Overhead lighting: Creates unflattering shadows on feet and toes
- ✗Too close lighting: Causes hot spots, blown highlights, and harsh shadows
- ✗Mixed color temperatures: Mixing warm and cool light creates color casts that are hard to fix
- ✗Underexposure: Trying to be "artistic" but losing detail in shadows
- ✗Ignoring skin tone accuracy: Light should render skin tones naturally, not too cool or warm
Composition Techniques for Stunning Footography
Great composition separates amateur snapshots from professional footography. These techniques apply regardless of whether you're shooting artistic or commercial content:
Rule of Thirds
Divide your frame into a 3x3 grid (most cameras have this as an overlay). Place key elements—like toes, ankle, or jewelry—at the intersection points rather than dead center. This creates visual interest and draws the eye naturally through the image.
Exception: Symmetrical compositions work well for artistic footography when intentional.
Leading Lines & Curves
Use the natural lines of legs leading to feet, or the curves of arches and toes, to guide viewers' eyes through the image. Positioning legs diagonally creates dynamism; horizontal positioning feels calm and restful. Experiment with S-curves formed by crossed feet or pointed toes.
Depth of Field & Focus
Shallow depth of field (wide aperture like f/1.8-f/2.8) blurs the background, making feet pop. Focus precisely on the area you want sharpest—typically the front toes or the arch. Slightly out-of-focus backgrounds add professionalism.
For detail shots (skin texture, nail polish), use f/5.6-f/8 to ensure entire foot is sharp.
Framing & Cropping
Don't feel obligated to show entire legs. Tight crops on feet and ankles can be more impactful than full-body shots. Leave appropriate negative space—crowding feet against frame edges feels claustrophobic. Experiment with vertical, horizontal, and square formats for different platforms.
Background & Context
Clean backgrounds (solid colors, soft gradients) work for commercial content and put focus entirely on feet. Environmental backgrounds (beach, bedroom, outdoor settings) add storytelling for lifestyle footography. Whatever you choose, ensure background doesn't compete with or distract from the subject.
Angles & Perspective
Shooting from slightly above creates an aesthetically pleasing view of feet and emphasizes toes. Eye-level perspective feels intimate and direct. Low angles (shooting upward) can emphasize arches but may create unflattering proportions.
Popular angles: 45-degree overhead, straight-on with toes pointed toward camera, side profile showing arch.
Poses & Styling: Making Feet Look Their Best
The difference between mediocre and excellent footography often comes down to posing and styling. Small adjustments make huge differences:
👣 Essential Posing Techniques
Pointed Toes
Extending toes elongates feet, emphasizes arches, and creates graceful lines. Point from the ankle, not just toes. This is footography's equivalent to a smile—almost always looks better.
Flexed Feet
Pulling toes back toward shins emphasizes soles and creates different energy. Works well for certain artistic concepts and sole-focused shots. Less commonly requested but has its place.
Natural Relaxed
Feet at rest without tension. Authentic and approachable for lifestyle content. Slightly point toes even when "relaxed" for better aesthetics.
Toe Spreads
Separating toes shows flexibility and detail. Popular in the commercial market. Ensure spreading looks natural, not strained.
Crossed/Layered
One foot crossed over the other or toes intertwined. Creates visual interest and shows both feet efficiently. Experiment with different crossing positions.
💅 Styling Elements That Sell
- •Nail polish: Clean, chip-free polish in popular colors (red, nude, black, pastels). French tips remain classic.
- •Jewelry: Anklets, toe rings, or delicate ankle bracelets add luxury and interest.
- •Footwear: Heels, sandals, sneakers, or boots partially on/off creates variety. Dangling a shoe from toes is popular.
- •Hosiery: Stockings, fishnets, or sheer tights add texture and variety. Ensure no runs or imperfections.
- •Props: Flowers, fabric, food items (whipped cream, fruits), or themed objects create storytelling opportunities.
- •Skin care: Well-moisturized skin, smooth heels, and maintained cuticles. This is non-negotiable for premium footography.
Post-Processing: Editing for Professional Results
Raw images straight from camera rarely represent your best work. Professional footography requires thoughtful editing, but there's a fine line between enhancement and over-processing:
🎨 Essential Editing Steps
- 1.Crop & Straighten: Refine composition, remove distractions, ensure horizon is level if applicable
- 2.Exposure & Contrast: Adjust brightness, shadows, highlights to create dimension and proper exposure
- 3.White Balance: Ensure accurate skin tones. Slightly warmer often looks more appealing than cool tones.
- 4.Skin Smoothing: Subtly smooth skin texture while retaining natural pores. Over-smoothing looks plastic.
- 5.Blemish Removal: Clean up temporary marks, scratches, or imperfections. Don't alter natural features like veins or freckles unless requested.
- 6.Color Grading: Apply consistent color look across your portfolio. This becomes your signature style.
- 7.Sharpening & Clarity: Add micro-contrast and sharpness to make details pop. Don't overdo it.
- 8.Noise Reduction: Clean up grain from high-ISO shots while preserving detail
⚠️ Editing Pitfalls to Avoid
- ✗Over-saturation: Pumping colors too high makes images look amateurish and unrealistic
- ✗Heavy filters: Using Instagram-style filters that clash with your subject matter
- ✗Inconsistent editing: Each image looking dramatically different in style
- ✗Plastic skin: Smoothing so aggressively that texture and realism disappear
- ✗Visible editing artifacts: Clone stamp marks, warp tool distortions, or halo effects from over-sharpening
Building Your Footography Style & Brand
Technical skills get you halfway there. The second half is developing a recognizable style that differentiates you in a crowded market:
Define Your Aesthetic
Are you clean and minimal? Moody and dramatic? Colorful and playful? Elegant and luxurious? Choose an aesthetic lane and stay relatively consistent. Buyers and followers appreciate knowing what to expect.
Study successful footography accounts—notice how top creators maintain visual consistency across their portfolios.
Develop Signature Elements
This could be a specific color palette, recurring props, unique angles, or editing style. Kendall Jenner's photographer always shoots with specific film aesthetics. You need your own "thing"—it makes you memorable and helps build a following.
Create Content Series
Rather than random one-off shots, develop themed series: "Seasonal Collection," "Color of the Month," "Day in the Life," "Travel Feet." Series give buyers more content to purchase and give you creative direction.
Build Your Persona
Who are you as a creator? The girl-next-door? The luxury lifestyle creator? The artistic soul? Your persona influences your content style, how you interact with buyers, and who your target audience is. Be authentic but strategic.
Monetizing Footography: Turning Skills Into Income
You've mastered the technical skills and developed your style. Now let's talk about actually making money from footography:
💰 Revenue Streams for Footographers
1. Marketplace Platform Sales
Platforms like Footly, FeetFinder, and others let you upload content for buyers to purchase. You set prices, buyers browse and buy.
Earnings potential: $500-5,000+/month depending on quality, consistency, and platform choice
2. Subscription Services
Monthly subscriptions for exclusive content. Subscribers pay recurring fees for regular uploads. Requires consistent output and engaged following.
Earnings potential: $10-50/subscriber/month × subscriber count
3. Custom Requests
Buyers commission specific shots: poses, angles, settings, props. Higher rates than pre-made content due to personalization.
Earnings potential: $50-300+ per custom set
4. Premium Content & Bundles
Offer tiered pricing: standard photos, premium edited sets, and exclusive bundles. Create scarcity with limited editions.
Earnings potential: Standard: $10-30, Premium: $50-100, Bundles: $150-500
5. Fine Art Prints (Artistic Footography)
Sell limited edition fine art prints if your work leans artistic. Requires high-quality printing and proper marketing to art buyers.
Earnings potential: $100-1,000+ per print depending on reputation and edition size
📊 Realistic Income Expectations
First 3 months: $100-500/month as you build portfolio and learn the market
Months 3-6: $500-1,500/month with consistent posting and growing following
6-12 months: $1,500-3,000/month for creators treating it seriously
12+ months: Top creators earn $3,000-10,000+/month with established brands and loyal buyer bases
Note: Earnings depend heavily on consistency, quality, platform choice, and marketing efforts. This isn't passive income—it requires real work.
Best Platforms for Selling Footography in 2026
Where you sell matters just as much as what you create. Platform choice impacts your earnings, audience reach, and creative control:
| Platform | Commission | Subscription Fee | Best For |
|---|---|---|---|
| Footly | 20% | $0 (free) | Modern UX, fast verification, algorithmic discovery |
| FeetFinder | 10% | $5-15/mo (required) | Established user base, basic features |
| OnlyFans | 20% | $0 | Large audience, subscription model, requires marketing |
| Patreon | 5-12% | $0 | Community building, recurring income, all content types |
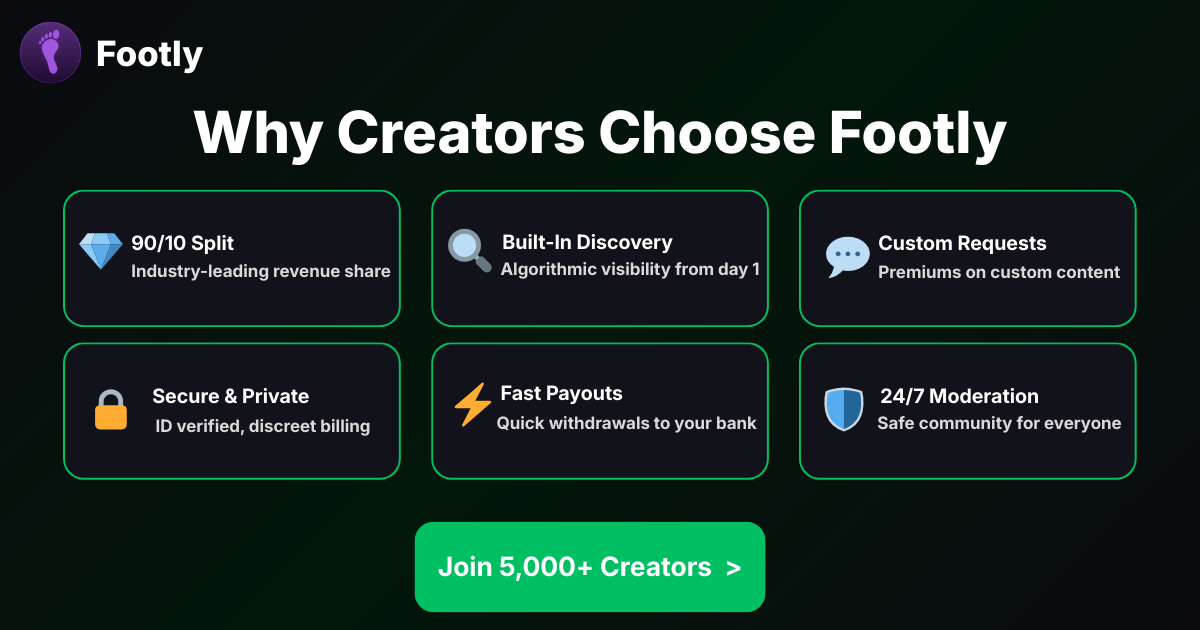
🏆 Why Footly Is Optimal for Footography
- ✓No subscription barrier: Start selling immediately without monthly fees. Perfect for testing footography as an income stream.
- ✓Algorithmic discovery: TikTok-style feed exposes your footography to buyers actively browsing, not just searching.
- ✓Fast verification: Get approved and start earning within 24 hours, not 3-7+ days.
- ✓Modern creator tools: Analytics dashboard shows which footography styles perform best, helping you refine your approach.
- ✓Built for creators: Platform designed by creators who understand footography workflow and needs.
Legal & Ethical Considerations
Professional footography requires understanding legal boundaries and ethical practices:
⚖️ Copyright & Ownership
You own copyright to photos you take of yourself (or others with proper releases). Once sold, buyers typically receive personal use rights only—not commercial rights or ability to redistribute.
- •Always watermark images until sold to prevent unauthorized use
- •Understand platform Terms of Service regarding content ownership
- •If photographing someone else's feet, get written model release
🔒 Privacy & Safety
- •Never show face: Unless intentional, avoid face/identifying features in footography
- •Remove metadata: GPS location and camera info can reveal private information
- •Use pseudonym: Don't use real name in your creator profile
- •Watch backgrounds: Ensure no personal info visible (mail, photos, addresses)
💼 Business Considerations
- •Report income: Footography earnings are taxable income in most jurisdictions
- •Track expenses: Equipment, props, software, and platform fees may be deductible
- •Understand platform payout: Different platforms have different payment schedules and methods
Common Footography Mistakes & How to Avoid Them
Mistake #1: Skipping Foot Care
Rough heels, chipped polish, or unkempt nails ruin otherwise good photos. No amount of editing can save poor grooming.
Fix: Maintain weekly pedicure routine. Invest in foot scrubs, moisturizers, and quality polish. This is your product—treat it well.
Mistake #2: Inconsistent Posting
Uploading 20 photos one week, then nothing for a month kills momentum and follower engagement. Algorithms favor consistency.
Fix: Batch shoot on weekends, then schedule 3-5 posts per week. Quality over quantity, but maintain presence.
Mistake #3: Ignoring Market Research
Creating only what you think is artistic without understanding what buyers actually want leads to low sales.
Fix: Study top-selling creators. Note common poses, angles, and styling. Balance artistic vision with market demand.
Mistake #4: Underpricing Your Work
Charging $5 per photo undervalues your time, equipment costs, and skills. It also attracts difficult buyers.
Fix: Research market rates. Price based on quality and effort. Start at $15-30 per photo, $50+ for sets, adjust based on demand.
Mistake #5: Poor Communication with Buyers
Slow responses, unclear boundaries, or unprofessional tone damages reputation and repeat business.
Fix: Respond within 24 hours, set clear expectations for custom work, maintain friendly but professional tone.
Getting Started: Your First 30 Days in Footography
Ready to start your footography journey? Here's a realistic 30-day roadmap:
Week 1: Foundation
- •Acquire basic equipment (smartphone, ring light, backdrop)
- •Start foot care routine (pedicure, moisturize, polish)
- •Research successful footography accounts for inspiration
- •Sign up for Footly and complete verification
- •Practice 20-30 test shots with different poses/angles
Week 2: Creation
- •Shoot your first 30-50 images across different styles
- •Learn basic editing in Lightroom Mobile or similar
- •Edit and finalize 15-20 best images for posting
- •Develop consistent editing style/preset
- •Create profile bio and branding on platform
Week 3: Launch
- •Upload first 10-15 images to Footly
- •Set pricing ($20-30 per photo, $50-80 for sets to start)
- •Post 3-5 times throughout the week
- •Engage with buyers who reach out professionally
- •Analyze which content gets most views/likes
Week 4: Optimization
- •Shoot more of what performed well
- •Continue posting 3-5 times per week
- •Start offering custom request services
- •Review analytics to understand buyer preferences
- •Build content backlog for consistent future posting
Advanced Footography Techniques
Once you've mastered basics, these advanced techniques separate professionals from amateurs:
Motion & Video
Short video clips of feet movement, toe wiggling, or walking add variety and command premium prices. Start with 5-15 second clips. Learn basic video editing. Many buyers prefer video over stills.
Water & Texture Work
Wet feet, water droplets, bubbles, or oil create visual interest. Requires understanding of lighting on reflective surfaces. Master this and you'll stand out from 90% of creators.
Creative Composites
Combine multiple images, add artistic overlays, or create surreal compositions in Photoshop. This pushes footography into true art territory and allows much higher pricing for unique pieces.
Location & Lifestyle Integration
Photograph feet in interesting locations (beaches, urban settings, nature) to tell stories. This appeals to buyers seeking more than just feet—they want context and narrative.
Macro Details
Extreme close-ups of skin texture, toes, nail polish details using macro lenses. Requires perfect focus and lighting but creates striking, unique images that buyers rarely find elsewhere.
Final Thoughts: Is Footography Right for You?
Footography isn't a get-rich-quick scheme. It's a legitimate creative practice that requires technical skills, artistic vision, business acumen, and consistent effort. But for those willing to learn and put in the work, it offers:
- ✓Creative expression: Develop artistic skills and unique style
- ✓Flexible income: Work on your schedule, scale effort to match goals
- ✓Low barriers to entry: Start with equipment you already have
- ✓Growth potential: Scale from side hustle to full-time income
- ✓Transferable skills: Photography, editing, and marketing skills apply to other areas
Success in footography comes down to three pillars:
1. Technical Excellence
Master lighting, composition, posing, and editing. Your work should be indistinguishable from professional photography.
2. Artistic Identity
Develop a recognizable style that sets you apart. Generic content gets lost; distinctive work builds followings and commands premium pricing.
3. Business Consistency
Post regularly, engage professionally, analyze data, and adapt based on what works. Treat footography like a business, not a hobby.
If you're willing to invest time learning photography fundamentals, developing your style, and consistently creating quality content, footography can become a rewarding creative outlet and income stream in 2026 and beyond.
The path forward: Start with the basics, invest in learning, maintain consistency, and choose the right platform. Footography is more accessible than ever in 2026—the only question is whether you're ready to put in the work to master it.